Screenshot of LensGo

LensGo

Discover LensGo in 2025! Learn what this video editing tool does, how to use its features like Video Style Transfer, AI Rendering, and AI Coloring, and see how it stacks up against other video editing software.

Screenshot

What is LensGo?

LensGo is a really versatile tool that lets you do some pretty cool things with your videos. One of its standout features is Video Style Transfer. Basically, it lets you take the style from a model or even an image and apply it to your video. Think of it like giving your video a whole new artistic look! Beyond that, LensGo also offers AI Rendering and AI Coloring, opening up a ton of creative avenues. It’s all about helping you explore different styles and effects, giving you a platform to really express yourself visually and transform your videos. LensGo’s smart capabilities make it a great resource if you’re looking to add your personal touch and enhance your video content using advanced AI tools.

Who created LensGo?

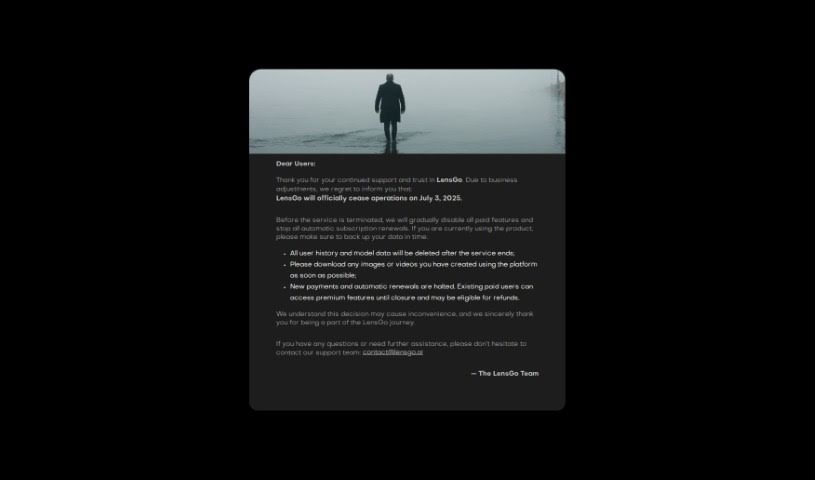
LensGo was developed by a Chinese software company named Zhuhai Right Brain Information Technology Co., Ltd. While the company is behind LensGo, specific details about the founder or more about the company itself aren’t readily available in the information I have.

Who is LensGo for?

LensGo is a fantastic tool for a wide range of creative professionals and enthusiasts, including:

  • Video editors
  • Content creators
  • Filmmakers
  • Graphic designers
  • Marketing professionals
  • Social media managers
  • Animators
  • Artists
  • Photographers
  • Game developers

How to use LensGo?

Using LensGo is pretty straightforward, and here’s a step-by-step guide to help you get the most out of it:

  1. Pick Your Tool: First things first, head over to the LensGo platform and choose the tool you want to use. Maybe you’re interested in trying out the Video Style Transfer feature, or perhaps something else.
  2. Upload Your Media: Next, you’ll need to upload the video or image file you want to work on. Just make sure it fits the platform’s requirements for size and compatibility so everything runs smoothly.
  3. Choose a Style: Now for the fun part! Select the specific model or style you want to apply to your video or image. This choice is what will really shape the final look and feel of your creation.
  4. Tweak the Settings: LensGo often gives you extra options to play with. You can explore things like color adjustments, different rendering settings, or any other parameters available to really fine-tune the output and make it exactly how you envision it.
  5. Check the Preview: Before you commit to the changes, it’s always a good idea to use the preview feature. This lets you see a quick look at how the style or modifications will appear on your media file.
  6. Apply Your Changes: Once you’re happy with what you see in the preview, go ahead and apply the modifications to your media file.
  7. Download or Share: After LensGo has finished processing your file, you can download the edited version to your computer, or if you prefer, share it directly from the platform.
  8. Discover More Tools: Remember, LensGo has other great tools like AI Rendering and AI Coloring. Don’t hesitate to explore these as well to further enhance your projects.

By following these steps, you can easily use LensGo’s features to creatively transform your media files. Have fun experimenting with all the different styles and tools to get the results you’re looking for!

Related AI Tools

Discover more tools in similar categories that might interest you

Stay Updated with AI Tools

Get weekly updates on the latest AI tools, trends, and insights delivered to your inbox

Join 25,000+ AI enthusiasts. No spam, unsubscribe anytime.